Affichage des articles dont le libellé est Techniques. Afficher tous les articles

mardi 29 août 2017

Grimgerde - Basecoats and chipping

Salut à tous ! Aujourd'hui, changement complet de sujet ! On passe dans l'univers manga, un monde que j'ignore complètement et c'est ça qui est bon !

Hi everyone! Today, we are completely changing our project! Let's go to the manga universe, a world I know nothing about and this is what is good about it!


Lorsque mon ami Laurent Tabib est venu à la maison, il m'a ramené une boîte assez imposante. Il s'agissait d'un Grimgerde au 1:100ème de la marque Bandai. Et il me l'a offerte ! N'y connaissant rien, je me suis dit que c'était le moment de changer de monde et d'appliquer ce que je sais des chars sur ce monstre. Il faut quand même dire qu'il mesure une vingtaine de centimètres de haut ! Donc c'est assez imposant !

When my friend Laurent Tabib came home, he brought quite a big box. It was the Bandai Grimgerde 1/100. And he gave it to me! As I know nothing about it, I thought it was time to move to an other world and to apply what I know of tanks on this beast. I must say that it is around twenty centimeters high! So it is quite impressive!


On a une structure articulée, sur laquelle viennent se placer les différentes parties d'armure, et tout se clipse et s'emboîte. L'ingénierie derrière le concept est fabuleuse ! C'est impressionnant !
Donc c'est parti ! Je retire toutes les pièces d'armure et décompose le squelette en sous-ensembles que j'apprête en noir One Shot Primer d'AMMO.

The structure is articulated, and on top of it the differents armor plates come, snapping and there you go! The engineering behind the concept is fabulous! It really is impressive!
So let's go! I remove all the armor parts and disassemble the skeleton and give the all parts a good primer of AMMO One Shot Primer.

Je vous préviens. Ce modèle ne souffre d'aucune planification précise. Je vais là où il m'emmène, mais j'ai quand même ma petite idée sur les techniques à employer. Non, pas envie de peindre les écaillures à la main, vive la technique de la laque à cheveux ! Donc j'applique un mélange brun rouge de peintures Tamiya (Red et Brown Red) sur toutes les pièces d'armure.

I tell you now. This model has not gone through a precise plan. I'm going where it takes me to, but I still have some idea on the techniques I will use. No, don't want to paint the chips by hand, let's go for some HS! Thus, I applied a mix of Tamiya brown red color (Red and Brown Red) on all the armor parts.

Puis, j'ai passé deux couches de Scratches Effects. J'ai encore un peu de mal avec ce produit, il a tendance à faire de grosses gouttes, donc, peut-être qu'il faut que je le dilue un peu. Le problème c'est que cela se voit et que quelques écaillures sont démesurées comme sur la "flèche" avant au niveau de l'entre-jambe. Pas grave, on rattrapera ça.
Lorsque le Chipping Fluid d'AMMO est bien sec, j'applique ma couleur bleu vert. Il s'agit en fait d'une couleur du set British and German Colors WWI d'AMMO. J'adore cette teinte ! Je l'applique aux pièces d'armure qui me plaisent. Puis une fois la peinture sèche, je la frotte délicatement (ou pas) avec un pinceau et avec des cure-dents, voire avec la lame de mon scalpel (la couleur s'éclaircit un peu lorsqu'elle ne s'écaille pas complètement, c'est chouette pour faire des éraillures très fines).

Then I applied two layers of AMMO Scratches Effects. I still find it difficult to use, because it tends to make large drops, so, I think I must thin it a little with water. The problem is that it is visible and some chips are too big like on the front "arrow" at the beginning of the legs. Whatever, I'll fix that.
When the AMMO Chipping Fluid was dry, I airbrushed my blue green color. Actually, this color comes from the British and German Colors WWI set by AMMO. I love this shade! I airbrushed it on the parts I like. Then, once the paint is dry, I softly (or roughly) brush it with a wet brush and some toothpicks and even a blade (the color gets lighter when it does not come off, it's cool to make really fine scratches).
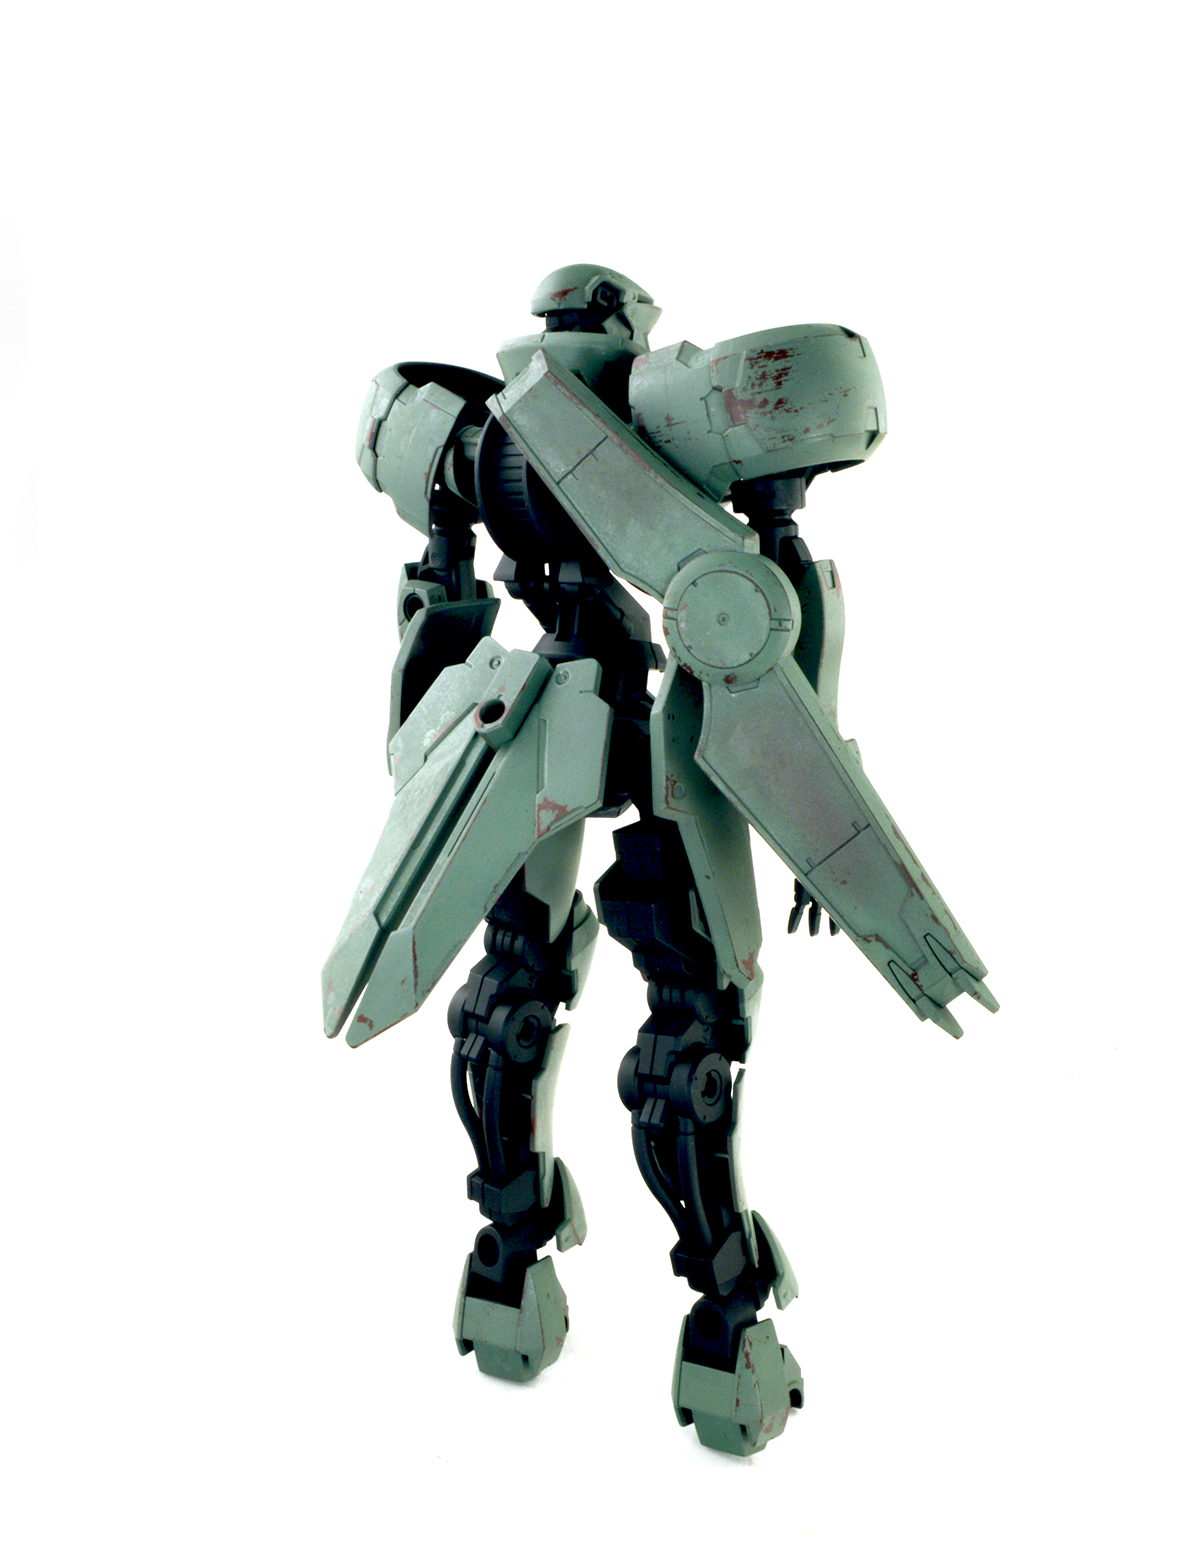


Puis on passe au rouge. Ici, c'est un rouge Tamiya pur dilué à l'eau et pulvérisé sans être totalement opaque. On recommence et on écaille la surface.
Les bandes et chiffres jaunes suivent le même procédé. Je découpe mon chiffre 7 dans trois épaisseurs d'adhésif Tamiya. J'applique de la laque à cheveux sur la pièce choisie. J'applique mon masque et je pulvérise la couleur jaune que je viens écailler. Je me suis rendu compte d'une chose : faire des bandes bien rectilignes sur des parties incurvées est bien plus difficile que je ne le pensais. Si quelqu'un a une bonne astuce !

Then, let's go for red. Here, it is a pure Tamiya Red that I thinned with water and airbrushed without totally covering the parts. Let's do it again and scratch the surfaces.
The yellow stripes and number follow the exact same process. I cut off my number 7 in three layers of Tamiya tape. I apply some hairspray on the chosen part. I place the mask and airbrush the yellow color that I will later scratch. I realised that it is quite hard to make perfectly straight lines on curved surfaces. If you have any tip, let me know!


Puis vient le gris. Je l'applique sur tout le squelette. Le noir me paraît trop austère... Je l'applique également sur certaines parties des boucliers. J'adore. Il s'agit d'un German Grey de Tamiya. J'applique le chiffre 7 sur l'un d'eux. Laque à cheveux, masque, peinture et écaillures. C'est amusant comme le gris ressort un peu violet contre la teinte bleu vert.

Then comes the grey color. I airbrushed it on the whole skeleton. Black is too sad... I also applied this color on some parts of the shields. I love it. It is a Tamiya German Grey. Then I added the number 7 to one of them. Hairspray, masks, paint and chipping. It is funny that the grey looks a bit purple on against the blue green color.


J'espère que ça vous plaît. Il me reste maintenant à trouver quelques décalcomanies, peut-être Bandai ou tirées de ma boîte à rabiot ! En tout cas, je m'amuse et ne réfléchis pas trop à l'évolution. Je savais que je voulais cette couleur bleu vert, mais les autres sont purement arrivées comme ça. Ca a un petit côté années 50 que je trouve drôle !

I hope you like it. I still have to find some decals, maybe Bandai or some coming from my spare parts box! Still, I'm having a lot of fun and I try not to think too much about how it comes along. I knew I wanted this blue green color, but the other ones came like this, simply. It has a 50s look to it, that is quite funny!


jeudi 13 juillet 2017

JS3 - Solder of fortune, Build and Sweat

Salut à tous ! Non, non, ce n'était pas un article le mois dernier et puis plus rien. La flamme est revenue et j'ai pris mon temps (1 mois) pour construire mon JS3. 1 mois c'est quand même long, mais quand on n'a pas le matériel adéquat, quand on a peu de temps et bien... ça fait un mois.

Hi everyone! No, no, I didn't write an article last month and then nothing. The flame is back and I took my time (1 month) to build my JS3. 1 month is a long time, but when you don't have the right tools, little time, well... it take a month.


Tout a commencé il y a bientôt 2 ans à Mol avec mon ami Max Lemaire. Nous étions partis à 3 avec Fabrice et le JS3 était en vente. J'en profitais également pour prendre une planche de photodécoupe, le canon en métal et les chenilles Friul (qu'il me reste à monter). Quelle journée épique, avec un retour beaucoup plus long que l'aller, et manifestement un lapin qui avait choisi le moment opportun pour traverser juste sous nos roues. Mais j'adore Mol !

It all started nearly 2 years ago in Mol with my friend Max Lemaire. We drove there, the 3 of us, with Fabrice and the JS3 was there. I took the opportunity to get some photoetch, a metal gun and the Friul tracks (that I still have to assemble). What an epic day, as the way back was much longer than the way to go, and eventually a rabbit had chosen the perfect time to cross the road and end up under our wheels. Still, I love Mol!

2 ans plus tard (donc maintenant), je me décidais enfin à monter le monstre. J'achetai un set de photodécoupe en plus et armé de mon superbe fer à souder Campingaz, je me lançais dans la soudure. Hourra ! Ceci peut expliquer certaines pièces bancales que je n'ai pas osé dessouder au risque de tout faire foirer. Un nouveau fer à souder plus tard (merci pour les conseils), le travail s'avère plus facile, même si de si petites pièces sont un véritable calvaire à monter. Personnellement, c'est l'expérience la plus difficile que j'ai eue la joie d'éprouver. Comprenez que le prochain kit (un 2S3 Akatsiya... Donbass) sera sorti de boîte. Mais je ne désespère pas de me lancer à nouveau dans l'aventure.

2 years later (that is now), I finally decided to assemble the beast. I bought an extra photoetch set and equipped with my fabulous Campingaz soldering iron, I started soldering. Hurray! This can explain why some parts are not straight and I didn't dare unsoldering them being afraid to ruin all the previous work. A new soldering iron later (thanks for the advice), the work felt much easier, even if so little parts are a real nightmare to assemble. Personally, it was the most difficult experience I had the pleasure to go through. Understand that the next kit (a 2S3 Akatsiya... Donbass) will be OOTB. But I do not give up and will certainly try the experiment again.


Le kit Tamiya est sans faille, et j'ai pris la liberté de ne pas ajouter toutes les pièces, d'ajouter d'autres pièces. Je n'ai pas non plus utilisé toutes les pièces des set de photodécoupe, parce que... J'en ai eu assez pour le moment.

The Tamiya kit is flawless, and I took some liberty to not add some parts, add others. I didn't use all the parts from the PE set, because... I had enough of it for the moment.

Malgré tout, je suis assez fier de moi. Pour une première expérience avec la photodécoupe, je pense que je ne m'en tire pas trop mal, même si la précision est loin d'être au rendez-vous. Peu importe, je me suis vraiment éclaté... A vrai dire, j'ai même un peu de peine que ça se termine, même si je ne peux plus voir de photodécoupe pour le moment.

Still, I'm quite proud of myself. For a first experience with solder and PE, I think I'm doing quite well, even if accuracy is not there. Anyway, I really had fun... To tell the truth, I'm a little bit sad this is over, even if I can't see any PE set for now.


J'ai pris plaisir à sentir l'odeur de la colle Tamiya, de m'amuser avec la pâte époxy et le bi-composant Tamiya également. Pour le reste, j'ai dû m'acheter une nouvelle chignole (la mienne a disparu pendant les travaux de la maison), un set de limes et de quoi polir le métal. C'était également la première fois que je réalisais mes propres lignes de soudure sur la coque du JS3.

I really enjoyed smelling the Tamiya glue, to have had fun with epoxy putty and the bicomposant Tamiya as well. For the rest, I had to invest in a new hand drill (mine disappeared during the work in the house), a set of files and something to polish the metal. It was also the first time I was making my own weld lines on the hull.


Voilà, j'espère que vous apprécierez le travail. Je ne sais pas si je vais commencer la peinture maintenant. Mais si vous avez des conseils, je suis preneur. Le 4BO c'est sympa, mais je pensais à un camouflage plus original et pas forcément historique.

Of course, I hope you like this work. I don't really know if I'll start painting soon. But if you have some advice, feel free. 4BO is cool, but I was thinking of something more original and not historically accurate.

Bien sûr, n'hésitez pas à faire des remarques et à me donner des conseils pour que les erreurs que vous pourriez voir ne se reproduisent pas à l'avenir. C'est comme ça qu'on progresse, non ?

Well, do not hesitate making comments and giving me advice so that any mistake you could see would be corrected on a future model. It's the way to improve, right?

mercredi 31 décembre 2014

Marder 3 - Gun & Interior

Salut à tous ! Oui, on a autre chose à faire le soir du réveillon du nouvel an, mais en attendant la soirée, pourquoi ne pas partager mes dernières avancées ?

Hi everyone! Yes, you probably have something else to do on the new year's eve, but why not share what I did today while waiting for the party to begin?


J'ai donc continué la mise en peinture et la patine du canon. De la même manière, j'ai utilisé la technique du Noir et Blanc. Cette fois, j'ai vraiment baissé la pression du compresseur pour appliquer la peinture acrylique. Cette fois, la peinture est vraiment lisse et c'est une véritable satisfaction. La sous-couche est aussi bien plus visible !

So I kept on painting and weathering the gun. Using the exact same technique, that is Black and White, I really put the pressure down when applying the base color. This time, the paint is really smooth and it's a pure satisfaction. The undercoat is also more visible!


Le vieillissement est le même que pour la caisse. Noix d'huiles diluées, streaking et un peu de travail aux huile par endroits. J'ai aussi appliqué un peu de diluant à certains endroits pour casser la tension de surface et ai appliqué quelques produit Ammo of Mig Jimenez (Streaking et Rust Streaking). Puis après quelques minutes, j'ai estompé l'ensemble pour donner des effets de rouille où de saleté, voire quelques ombres.

The weathering is the same as previously. Oil dots thinned, streaking and some pure oil work on places. I also used some thinner to break the surface tension and added some Ammo of Mig Jimenez products (Streaking and Rust Streaking). Then, after a few minutes, I blended the whole to give some rust, or dirt or even shadow effects.


Quant à l'intérieur, j'ai délibérément choisi une peinture un peu plus jaune et sombre que le reste. Le but est de créer un contraste. Les parties intérieures, bien que partiellement exposées à la lumière, restent tout de même assez ombragées, donc la peinture est moins pâle. Puis, j'ai appliqué quelques éraillures et un très généreux pinwash (que j'ai volontairement fait déborder pour créer des ombres) que j'ai estompé. Vous remarquerez qu'il y a un oubli sur la gauche... Je retravaillerai ça (si ça veut bien s'estomper encore demain).

Concerning the interior, I deliberately chose a yellower and darker color than the rest of the vehicle. The goal was to create a contrast. The interior parts, even if they are exposed to the light, remain quite in the shade, so the paint tends to be less bright. Then, I applied some scratches, and a very generous pinwash (that I overpainted to create shadow) that I then blended. You'll notice that I forgot some on the left side... I'll work it later (if it blends alright).


Et voilà le résultat ! J'espère que ça vous plaît !

And here's the result! Hope you like it !


Il ne me reste plus qu'à vous souhaiter une excellente année 2015 ! Qu'elle soit pleine de kits !

I just have to wish you a wonderful year 2015! May it be full of kits!

lundi 29 décembre 2014

Marder 3 - Black and White Techique

Salut à tous ! C'est les vacances, j'ai un peu de temps, alors j'en profite pour me mettre au travail. Ce Marder 3 monté par mon ami Laurent Tabib se révèle un excellent sujet pour donner encore une chance à la technique magnifique de José Luis Lopez Ruiz du Noir et Blanc. Pour rappel, le maquettiste talentueux a publié un livre chez Histoire & Collections dont j'ai fait une petite revue.

Hi everyone! I'm on holidays, I have some time, so I'm taking the opportunity to get back to work. This Marder 3 built by my friend Laurent Tabib is an excellent subject to give another go at the wonderful technique developed by José Luis Lopez Ruiz - Black and White. As a reminder, the gifted modeler published a book with Histoire & Collection, and I made a review on it.


Commençons simplement... Enfin, simplement n'est pas le mot le plus adéquat ici, car tout l'enjeu est de proposer un vieillissement en noir et blanc de notre sujet en lui appliquant ombres et lumières soit par modulation, soit par lumière zénithale. On commence par un bel apprêt blanc, bien lisse qu'on viendra assombrir, puis éclaircir à nouveau afin de donner du volume à l'ensemble. Mes précédents modèles manquaient de volume à mon goût. Je ne suis d'habitude pas friand des pré-ombrages qui revient à souligner les creux en noir avant de passer à la phase de peinture, mais il me manquait cet aspect là. Trop d'aplats de couleurs que je venais ensuite assombrir à l'aide de peintures à l'huile. J'aime beaucoup ce type de travail, mais il est bon d'utiliser des techniques différentes et de les combiner.

Let's make it simple... Well, simple isn't the right word here, because the main goal is to give the model some weathering in black and white, adding lights and shadows either using modulation, or zenithal lighting. We start with a nice and smooth white primer that we will darken and highlight again to give volume to the whole. My last models were missing this depth. I'm not really into pre-shadowing by underlining the recesses using black before applying the basecoat, but I really think I was missing something. Too much plain colors that I used to darken with oil paints. I like it a lot, but sometimes it's good to use different techniques and combine these techniques.


Une fois les ombres et éclaircies appliquées en utilisant différentes teintes de gris (non... pas 50 nuances de gris, mais 6 suffisent) j'ai joué un peu avec des peintures acryliques plus ou moins diluées pour ajouter des éraillures et autres taches sur mon modèle. Le but est que ces dernières soient visibles par transparence une fois ma base peinte.

Once the shadows and highlights are applied using different tonalities of gray (no... not 50 shades of gray, but 6 are enough), I had some fun using acrylique paints more or less thinned to add some scratches and stains on the model. The goal is to make them visible, using transparency, once my basecoat is applied.


La peinture est très diluée pour la couche de base. Mais, c'est là où je suis moins satisfait, elle a tendance à devenir un peu granuleuse. C'est vraiment embêtant. J'ai utilisé un vieux set de modulation et je pense que la pression était trop forte ce qui a pour effet de faire sécher la peinture avant qu'elle n'atteigne la surface. J'ai utilisé un jaune relativement  clair. Puis une teinte plus claire pour les surfaces hautes et une plus foncée pour les surfaces basses. Oui... Bon... On n'est pas censé le faire, mais j'avais vraiment envie d'accentuer l'effet zénithal. Mais je suis tout de même satisfait car le noir et blanc apparaît (un peu) sous ma couche de base.

The paint has to be quite thinned. But I'm not that satisfied with the application of it, for it looks a bit grainy. I hate it. I used an old modulation set and I think the pressure was too high, making the paint dry before it reaches the surface. I used a really light yellow. Then a brighter tone for the high surfaces and a darker one for the low ones. Yes... Well... I'm not supposed to do this, but I really wanted to make the zenithal effect pop out. But I'm quite happy to see that the black and white still appear (a little) underneath the basecoat.


Un maillage vert est ensuite peint... Un petit raté sur le côté gauche du Marder, mais ça ne se voit pas trop. J'ai fait en sorte que ce maillage soit très transparent, presque invisible au sommet du char. Enfin, un petit coup de jaune transparent me permet d'unifier l'ensemble.

Then a green netting is painted... I missed it on the left side of the Marder, but it's not that visible. I made it so that it becomes very transparent at the top, nearly invisible. Finally I added some transparent yellow to unify the paint.


Le pinwash se fait sans problème, et j'utilise la technique des pointes d'huile. Quelques couleurs claires sur les hauteurs et d'autres plus sombres sur les parties basses que je fonds à l'aide d'un pinceau juste imbibé de diluant. Je repète la technique 2 ou 3 fois avec des teintes différentes à différents endroits pour donner un peu d'effets à l'ensemble.

The pinwash is not a problem, and then I used the oil dots technique. Some bright colors on the top and dark ones on the low parts that I blend using a brush dipped in thiner. I repeated the process 2 or 3 times to get different effects on different surfaces.


Quelques effets de streaking sont visibles... Je les ai un peu estompé après la séance photo.

Some streaking effects are visible... I blended them a little more after the shooting.


J'espère que vous aimez... J'essaierai de continuer demain et de vous tenir informé de l'évolution ! ;)

I hope you like it... I'll try to keep going on tomorrow and I'll keep you on the track! ;)

samedi 26 juillet 2014

Experimenting working pigments!

Hi everyone! This quick post will be exclusively in English since I wrote it for myself and shared it Michael Rinaldi. Pigments are hard to use for me, but fortunately practicing pays!

I.                    Yesterday’s attempts


These two pictures are yesterday’s first try at using pigments. I carefully brushed them and I somehow liked the effect near the cupola, although the pigments were a bit too big on the edge of the opening.


On the second picture, there were massive pigments added and then brushed around the details. I left them quite compact and misted some X-20A. Of course the result is massive pigments with no background pigments underneath. It looks like chunks of dust deposited like very small stones and doesn’t look realistic at all.
Both tries were irrelevant. It is starting to look the part near the episcope, but I think I just brushed these pigments today (you can see one very strong brush stroke) after another failed attempt, yesterday.


II.                  Today’s attempts


Near the welding line was a sponge attempt. I diluted pigments in water. It looks awful. It may be interesting in adding splashes, but I will forget this idea.

Around the opening was today’s try. The pigments were applied in one go and I brushed them carefully to reach the opening. Still, there are some visible brush strokes that are unwanted. Either this may result in some bigger pigments being crushed into the surface and leaving a line, or the brush stroke that was too strong on the surface, but I was really careful. Would another round of pigment have softened the result? Maybe but if I want just that small amount of pigments, then I’m stuck.


III.                Starting to look the part?


On this one, pigments were applied very softly with just a few pigments at a time and in 2 layers. The result is softer, I think the pigments have blended just enough. There was then an attempt at adding some Green Enamel on it. It looks fine on the picture but I think it still has some hard edges. I did this quite simply. I added some Slimy Dark Green that I diluted a lot and removed the excess on a paper towel. Then I touched the surface and watched it flow. I used my hairdryer to dry the thinner quickly to avoid tidemarks.


More dust here. I was afraid it would really bleach the surface and it did in some aspects. The base color is nearly invisible underneath. My question is “Is it believable? Does it look natural enough?” There were 3 rounds of pigments on this. I started from nearly the half of the surface and moved towards the edges trying just to push the pigments. I tried softening the edges by places but the pigments hold really toughly on the surface.

I also applied some Slimy Dark Green, and here the edge look harder. This question has still to be solved. It also happens with mud. Whenever I apply pigments on the lower hull and add some enamel effects on them with a brush, the thinner would flow and once it’s dried the edges are hard and not realistic. Is it a matter of dilution or a problem in the application process?


Right near the gun, under the welding line, the pigments were applied yesterday in one round. It looks like small rocks and there are barely any pigments underneath. I didn’t dare touching this with my brush, for I was quite sure they would leave marks on the surface.
Near the hook on the right hand side was a sponge application.

IV.                Previous attempts
Everything was tried today.


On this olive drab piece of styrene, I used 2 batches of pigments on the bottom right corner and the top left corner. The top left has around 4 to 6 pigment application. The colors underneath is not visible anymore, whereas the right one is visible in some places. For the latter, I worked my way from the center to the corner carefully pushing the pigments and fixing them when I reached the edges. Then I added some more pigments in the center that I pushed in part (some remained at the center) to the flat edge. The olive drab is still visible (partly) and was the result of 3 applications of pigments.
The bottom left corner and the very small right flat edge were just one pigment (the brightest) use with 2 or 3 applications.
Now the question is “for the 4 to 6 rounds of pigments. Is it too much?” If I want to have some transparency then I’m obviously going wrong. Still, there were many pigments in the top left corner, so that would explain it all. But is it really possible to get transparency when going through that many rounds?

 
On this Dark Yellow Primer, I am quite happy with the result on the right hand. I guess I used mid tones and light tones going from dark to bright (bright on top). It has a grainy finish that I like and this is what decided me to start operating on my model. It has some transparency and there is a gradation of colors that seems to be ok. The pigments are not chunky.
Still I did the exact same thing using only bright tones on the left and although it looks quite transparent some chunks remained, which doesn’t look too realistic.

V.                  Conclusion
Thus I am still wondering and experimenting on the techniques of pigment application. Being more satisfied with the very last piece of styrene, I think I am heading to the right direction.
However the notion of layering is still quite hard to apply on such small surface of application and the base color may suffer from the repeated application of pigments, considering my level. Even if I try adding very little pigments at a time, I find it hard to keep the right look.
Still, I feel comforted in the idea that adding pigments over pigments is not destroying the previous layer and adds in realism, as far as my limits are for now.

OPR and pigments is another subject that I should train on, avoiding tidemarks and hard edges. I barely touch the surface to unload the paint and not remove the pigments making them muddy, but the result is these hard edges and sometimes some tidemark when it comes to working on mud surfaces.

Another thing pointed out by Mike was the fact that the surface is really grainy. This happens when working with modulation. The angle taken by the airbrush makes the paint hit the surface in various ways. Sometimes it gets smooth when close enough and sometimes the paint dries before hitting the surface making it grainy...


FINALLY !!!
On this T-34 1/48th,
After many attempts, I really worked my way very slowly and added pigments little by little pushing them soflty and got to these results. The combination of HS, OPR and Pigments seems to work very well and I am very thankful to Michael Rinaldi for his long-time support and patience. Still, this has to be improved!