dimanche 23 septembre 2012

Stryker - Streaking Effects (Part 8)

Mes amis ! Le soleil joue à cache-cache ! (Le 7ème épisode est ici !)

My dear friends! The sun is playing hide-and-seek! (Episode #7 is here!)

Une fois de plus j'ai utilisé la gamme des produits de chez AK-Interactive pour mettre travailler les traînées de salissures sur mon Stryker. J'attendais cette étape avec impatience pour assouplir la phase d'éraillures précédente.

Once more, I used the range of products from AK-Interactive to create my streaking effects on the Stryker. I've been waiting for this impatiently to soften the previous chipping step.

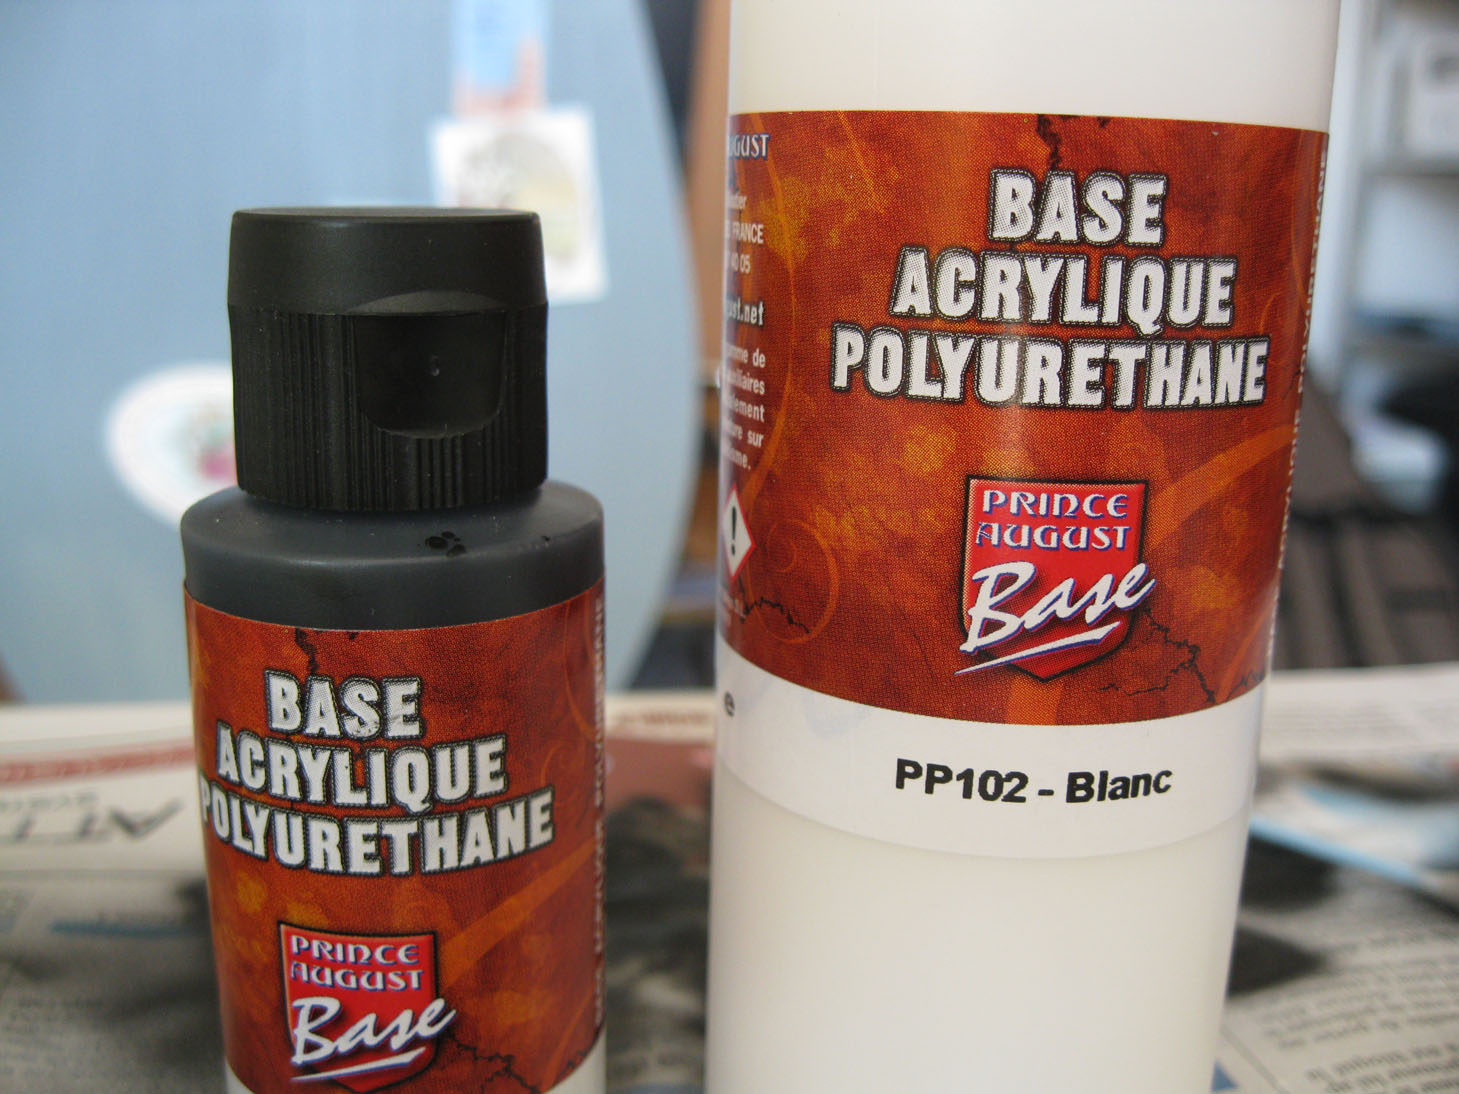
Voici les produits dont nous avons besoin :

Here are the products we need :

  • AK 012 Streaking Grime
  • AK 014 Winter Streaking Grime
  • AK 013 Rust Streaks
  • AK 046 Light Rust Wash

Je vous conseille vraiment de bien secouer ces petites fioles avant utilisation, histoire que les pigments se répartissent bien dans leur diluant.

I really recommand that you shake well these small bottles before use, so that the pigments get well mixed in the thinner.


Pour les traînées :
  1. A l'aide d'un pinceau fin, je trace des lignes plus ou moins fines et longues sur les zones désirées. N'hésitez pas à faire en sorte que cela soit arbitraire.
  2. J'attends une quinzaine de minutes, le temps que les pigments commencent à adhérer au modèle.
  3. Je trempe un pinceau plat (ou fin selon les envies) dans un peu de White Spirit (ou du diluant Humbrol) et j'éponge à mort sur un essuie-tout.
  4. Je glisse le pinceau de bas en haut sur les zones précédemment peintes. J'effleure vraiment les traînées pour qu'elle fondent doucement. Soyez vraiment doux.
  5. J'admire avec un sourire béat le résultat obtenu et je prends des photos.
N'oubliez pas que ces effets prennent 12 heures avant de sécher complètement. Donc si vous voulez répéter cette opération, patientez, sinon vous risquerez d'anéantir tout votre travail !

For the streaking effects :
  1. With a fine brush, I draw lines more or less fine and long on the wanted areas. Don't hesitate to display them randomly.
  2. I wait 15 minutes at least, the time for the pigment to stick to the model.
  3. I dip a flat brush (or a fine round one, depending on your aim) in a small amount of White Spirit (or in Humbrol thinner) and I use a kitchen roll paper to soak it up to death.
  4. I slightly wipe the areas previously painted from the top to the bottom. I really brush them smoothly to melt the streaks tenderly. Be absolutely tender. (Modelling is romantic).
  5. I admire the work done with a naive smile and I take pictures.
Don't forget that you'll have to wait at least 12 hours for the streaking effects to dry completely. So if you wish to add some more streaks, wait, otherwise you'll just ruin the whole work!


Le Light Rust Wash a une utilisation particulière ici. Je l'applique en quantité presque généreuse sur certaines zones et après de longues minutes d'attentes, je viens les estomper avec du White Spirit en poussant les pigments dans les recoins. Cela donne un effet rouille discret mais présent.

The Light Rust Wash has its particular use here. I apply it in an almost generous quantity on certain areas and, after a long wait, I shade it off with White Spirit pushing the pigments in the recess areas. That gives a smooth rusty aspect, but still visible.

J'espère que cela est visible sur les photos, mais j'ai aussi pris soin de mettre en valeur certains éléments. Il n'y a rien de pire que la symétrie dans un modèle. Ne faites pas les mêmes effets sur deux trappes voisines, ou n'utilisez pas la rouille sur chaque boulon ou écrou, mais soyez arbitraire dans votre choix. Votre modèle gagnera en détails. Enfin, j'essaie... Après, ça marche ou ça ne marche pas. Vous êtes juges ! Je m'éclate et c'est le plus important, pas vrai ?

I hope that this is visible on the photos, but I took care to put forward some elements. There's nothing worse than symmetry on a model. Don't do the same effects on two trapdoors, or don't use rust on each screw and bolt, but be random in your choice. Your model will be more interesting to watch. Well, I'm trying... Then, it works or not... You're the judge! I'm having fun, and that's what really matters, doesn't it?


samedi 22 septembre 2012

Stryker - Chipping (Part 7)


Hello everyone ! Part 6 is here.


Entre hier matin et ce matin, je me suis concentré sur le travail d'éraillure. J'ai décidé pour mon Stryker d'utiliser la technique du mapping, histoire de donner un peu de volume au total. C'est "la première fois" que je le fais. J'insiste sur ce point parce que je ne m'y suis jamais réellement intéressé, mais je voulais essayer sur un modèle complet. Autant vous dire que ma satisfaction reste relative. Certaines éraillures ne me plaisent pas. Mais vous me le direz, n'est-ce pas ?

Between yesterday morning and this morning, I was focused on the chipping process. I decided to use the mapping technique on my Stryker, just to give it some volume. It's "the first time" I do this. I insist on this aspect because I never got really interested in it, but I wanted to try it on a complete model. Let's say that my satisfaction is relative. I don't really like some of them. But you'll tell me, right?

Ma première question concernait le type de blindage que possède le Stryker et Djiti sur le forum des Colleurs de Plastique m'a été d'une grande aide, et je tiens à le remercier. Le Stryker n'est pas en aluminium, mais en acier et la plupart de son blindage est en composite céramique, donc le travail d'éraillure doit être précis. La couleur jaune ou ocre peut être utilisée sur la céramique et la rouille sur les parties métalliques.

My first question was to know how to deal with the armor of the Stryker and Djiti on the forum of the Colleurs de Plastique really helped me, and I'd like to thank him. The Stryker is not made of aluminum but of steel and most of its armor is a ceramic composite, so the work of chipping must be accurate. The yellow or ocre can be used on ceramic and rust can be applied on the metalic parts.


J'ai donc réalisé un mapping en utilisant un mélange des couleurs Vert Réfractaire et Chair Claire de Prince August. Certaines me semblent encore un peu large. C'est dommage, mais j'espère pouvoir estomper tout cela grâce aux différents effets de coulures, puis d'empoussiérage. Enfin... J'espère vraiment !
Au centre de chaque (ou presque) mapping, j'ai appliqué les teintes German Camo Black et Jaune Ocre de Prince August, au pinceau fin 2/0 de chez AK-Interactive (je voulais essayer... Ils sont assez bien...)

So I did the mapping using a mix of Vert Réfractaire and Light Skin from Prince August. Some chipping areas seem a bit too large. It's a pity, but I hope I'll be able to blend these with the different streaking effects, and dust. Well... I really hope!
At the center of each (or nearly) mapping, I painted German Camo Black and Ocre Yellow from Prince August, with a fine 2/0 brush from AK-Interactive (just wanted to try... they're quite okay...)

Je vous avais prévenu ! Le sous-titre de mon blog est "Essayer de monter et de peindre des modèles"... Pas forcément d'y parvenir du premier coup !

I told you! The subtitle of this blog is "Trying to build and paint models"... Not necessarily to succeed in the first time!


mercredi 19 septembre 2012

Stryker - Oil Nuts (Part 6) - Studio photo

Bonjour à tous !

Hi everyone !


Je n'ai pas eu beaucoup de temps pour continuer mon Stryker aujourd'hui. Petit problème avec bus qui a jugé bon ce matin de me couper la route sans même s'arrêter, malgré avoir frappé sur la vitre. Résultat un rétroviseur abimé. Du coup, j'ai du passer au garage après m'être rendu à la compagnie de bus incriminée. Youpi !

I didn't have much time to work on the Stryker today. Got a little problem with a bus that found it would be great to cut priority this morning. He never stopped although I knocked on his window. The result is a damaged mirror. So, I had to go to a garage after meeting the boss of the bus company. Hurray!

Néanmoins, j'ai quand même réussi à travailler un peu sur les noix d'huile. Travail simple, mais j'éprouve encore quelques difficultés. J'aimerais que le tout ne se mélange pas autant, mais le résultat final me plaît. J'ai même réussi à créer quelques zones d'éclaircies blanches en posant un peu de peinture blanche que j'ai estompé avec un pinceau pratiquement sec. Cela fonctionne bien sur certaines parties, mais pas sur toutes.

Nevertheless, I managed working the oil nuts. Simple work, but still I find it tough when I don't want the whole process to be melted too much, but the final result is suitable. I even succeeded in creating enlightened areas by applying a very small amount of paint that I sprayed with an almost dry paintbrush. I works on some parts, but not all of them.


J'en profite aussi pour vous faire part de ma trouvaille ! Je me suis confectionné un micro studio photo. J'ai pris un carton de papier dont j'ai découpé les côtés. Puis j'ai recouvert l'intérieur de papier blanc. Enfin, j'ai utilisé deux lampes pour éclairer mon Stryker. Je ne suis pas encore satisfait, cependant. Une dernière découpé sur le dessus avec une troisième lampe seraient bien mieux. Voici les photos ! Prochain investissement... Un trépied. Désolé pour la qualité de certaines photos.

I grab the opportunity to share my discovery with you! I built myself a tiny photo studio. I took a cardboard box which sides I cut. Then I glued white paper everywhere in it. Finally I used two lamps to light my Stryker. I'm not yet satisfied. A last cut on the top with a third lamp would be much better. Enjoy the pics ! Next purchase will be a tripod. Sorry for the quality of the pics.


samedi 15 septembre 2012

Stryker - Washes (Part 5)


Après avoir passé quelques filtres Sin, j'ai ensuite appliqué un vernis sur mon Stryker et fait le long travail de lavis et autres pinwash... C'était long !

After having applied some filters from Sin, I airbrushed a coat of varnish on my Stryker and started the long work of washes and pinwashes... That was long!

D'avance, je m'excuse pour la qualité des photos... Le soleil s'en est allé et ma lampe éclaire bien trop, créant d'indésirables reflets.

In advance, I want to apologize for the quality of the pictures... The sun is gone and my lamp is too shiny, creating unwanted reflections.


mercredi 12 septembre 2012

Stryker - Modulation (Part 4)

Mes chers amis !

My dear friends!


Je n'en pouvais plus d'attendre avant de continuer sur mon Stryker (dont le précédent épisode se trouve ici). J'ai décidé d'utiliser une très légère modulation sur ce modèle, car il est relativement plat et je craignais d'avoir un trop grand écart de couleurs entre le bas et le haut de la caisse.
J'ai pour cela utilisé les couleurs Tamiya XF-13 J.A. Green, XF-57 Buff, XF-02 Flat White et XF-71 Cockpit Green.

I couldn't stand waiting before working on on my Stryker (which last episode is here). I decided to use a very light modulation on this model, since it is quite flat and I was scared to get a too great difference of colors between the upper and the lower hull.
I thus used the Tamiya colors XF-13 J.A. Green, XF-57 Buff, XF-02 Flat White and XF-71 Cockpit Green.

Ma première couche était dilué à 50/50 puis les autres à deux unités de peinture pour huit de diluant, avec un ajout régulier de 10% à 20% de couleur Buff. Enfin la dernière couche est d'une unité de peinture pour neuf de diluant avec du blanc pur.

My first layer of paint was diluted in a 50/50 rate, and the others were 2 units of paint for eight of thinner, with an regulare addition of 10% to 20% of Buff. Finally the last layer was pure white mixed in a proportion of one unit of paint for nine of thinner.

Enfin pour terminé, j'ai repris quelques détails au XF-71 pur.
J'espère que ça vous plaît.

To finish, I painted some details with pure XF-71.
I hope you'll like it.

Côté pratique, vous pouvez désormais vous abonner par mail à chaque nouvelle publication. J'ai eu un problème car je pense que certains abonnés recevaient leurs notifications en double. Cela est chose réglée !
Cela se passe en haut à gauche de la page d'accueil !

On the practical side, you can now subscribe by Email to each new publication. I've had a problem because I think some subscribers were receiving double notifications. It's now fixed! This is on the top left of the main page!


samedi 8 septembre 2012

Stryker - Base Vallejo (Part 3)

Bonjour à tous !

Hi everyone !

Cher modéliste, toi qui me suis depuis des années (je sais, le blog n'existe que depuis le mois d'Août de cette année, mais je peux hyperboler non ?) aujourd'hui est un petit pas pour l'humanité, mais un grand pas pour moi, même si je n'en ai pas fait beaucoup ces dernier jours.

Dear modeller, you, who have been following me for years now (I know, the blog has been created in August this year, but I can exaggerate right?) today is a small step for mankind, one giant leap for me, even if I haven't made many steps these last days.

Adieu vilaine bombe d'apprêt ! Toi qui me forçait à te tenir d'une main, de l'autre saisir mon modèle, les clés entre les dents à devoir déambuler dans le terrain vague près de chez moi, poussiéreux pour enfin apprêter ma pauvre maquette. Avec un peu de malchance, un doigt glissait laissant une empreinte indélébile ou pire laissant tomber mon modèle sur le sol jonché de sable, de terre et de feuillages en tout genre.

Adieu mean primer in a can! You, who forced me to hold you in one hand, the model in the other hand, my keys between the teeth, forced to wander in the wasteland near my flat, dusty to finally prime my poor model. With a bit of poor luck, a finger used to slip leaving an unerasable fingerprint or worse making the model fall on the ground full of sand, earth and leaves.

Aujourd'hui, je remercie Vallejo d'avoir enfin créé un apprêt digne de ce nom ! J'allume mon compresseur, branche mon aérographe, verse un peu de ce liquide précieux sans dilution et j'apprête, assis chez moi, mon Stryker sur ma petite table de camping, faisant office d'atelier de fortune. Et je suis heureux !

Today, I thank Vallejo to have finally created a primer, which deserves its name! I turn on the compressor, plug the airbrush, pour some of this precious liquid with no dilution and I primed my Stryker, seated comfortably in front of my camping table, playing the role of my fortune workbench. And I am happy!

Cela peut sembler stupide, mais c'est bien plus simple d'utiliser la gamme "Base Acrylique Polyuréthane" de Vallejo (redevenons sérieux). Vivant en appartement, je devais systématiquement sortir pour apprêter mes maquettes et les risques de mauvaise manipulation étaient bien là ! Cet apprêt est vraiment tout ce que j'attendais !

This could seem stupid, but it's much easier to use the "Acrylic Polyurethan Base" primer from Vallejo (let's be serious again). Living in a flat, I had to go out to prime my models and the risks of bad manipulation were real! This primer is really what I was longing for.

Voici ses avantages :
- Pas de dilution
- Une plus grande précision
- Un pouvoir couvrant impeccable
- Une facilité d'utilisation
- Moins volumineux qu'une bombe
- Un fini parfait

Here are the good aspects:
- No dilution
- A greater accuracy
- A great covering
- Easy to use
- Smaller than a can
- A perfect finish

Mais attention, il faut souvent penser à nettoyer votre aérographe en cours d'utilisation, mais le nettoyage est très aisé !

But be careful, you'll have to often clean your airbrush while using, but cleaning it is very easy.

Voici mon Stryker, j'ai volontairement forcé le trait au niveau du noir.

Here's my Stryker, on which I emphasized the black lines.